The main objective when washing your car is to get it as clean as possible without causing any damage or scratching the paintwork.
Removing all the dirt, grime, and debris while minimising the amount of contact with the paint.
We highly recommend that any car wash is done out of direct sunlight, e.g. in the shade, under a carport etc.
In our opinion the key steps to a great basic car wash, in order, are:
- The Pre Wash
- Engine Bay ( optional )
- Wheels and Tyres
- Exhaust
- Paintwork, Paintwork, and Windows
- Protection and Drying
1. The Pre Wash
The goal of the pre wash is to remove as much of the dirt, grime, and larger contaminants as possible before a sponge or wash glove comes into contact with the car.
Using a snow foam cannon is the best and easiest way to do a good pre wash.
Fill your snow foam cannon with A2 Degreaser (diluted as per label), S3 is a effective alternative to A2.
Spray the entire vehicle covering it in a thick layer of foam, remember to get the everywhere, the wheels and tyres, under the wheel arches/inner guards, leave the foam to sit for 2-5 minutes ( do not let it dry ), and then rinse thoroughly with a pressure washer.

2. Engine Bay
Not always necessary; we like to do this step on our vehicles every 10th-15th wash depending on how clean/dirty the area is.
The main thing to avoid here is getting water in your electrical components. A good practice is to cover these areas with something like a plastic bag before starting this step, things like your battery, fuse box, spark plug leads/coil packs.
If at all unsure please ask your mechanic which areas to avoid or simply skip this step.
Using Pump Cannon #3 and some A2 Degreaser ( diluted as per label ) spray the engine bay with foam, leave to sit for a minute or two and then agitate with a detail brush, rinse thoroughly with a pressure washer.

3. Wheels and Tyres
Good practice when cleaning your wheels and tyres is to focus on one wheel from beginning to end before moving onto the next wheel.
Using the wheel cleaner of your choice, we would recommend W1 Wheel Cleaner and Iron Remover or, if your wheels have a protection coating on them, we’d recommend W2 Wheel Cleaner.
Spray the wheel cleaner onto the wheel, tyre and inner guard, leave the product to sit for 2-3 minutes and then agitated with a wheel brush, thoroughly rinse using a pressure washer.

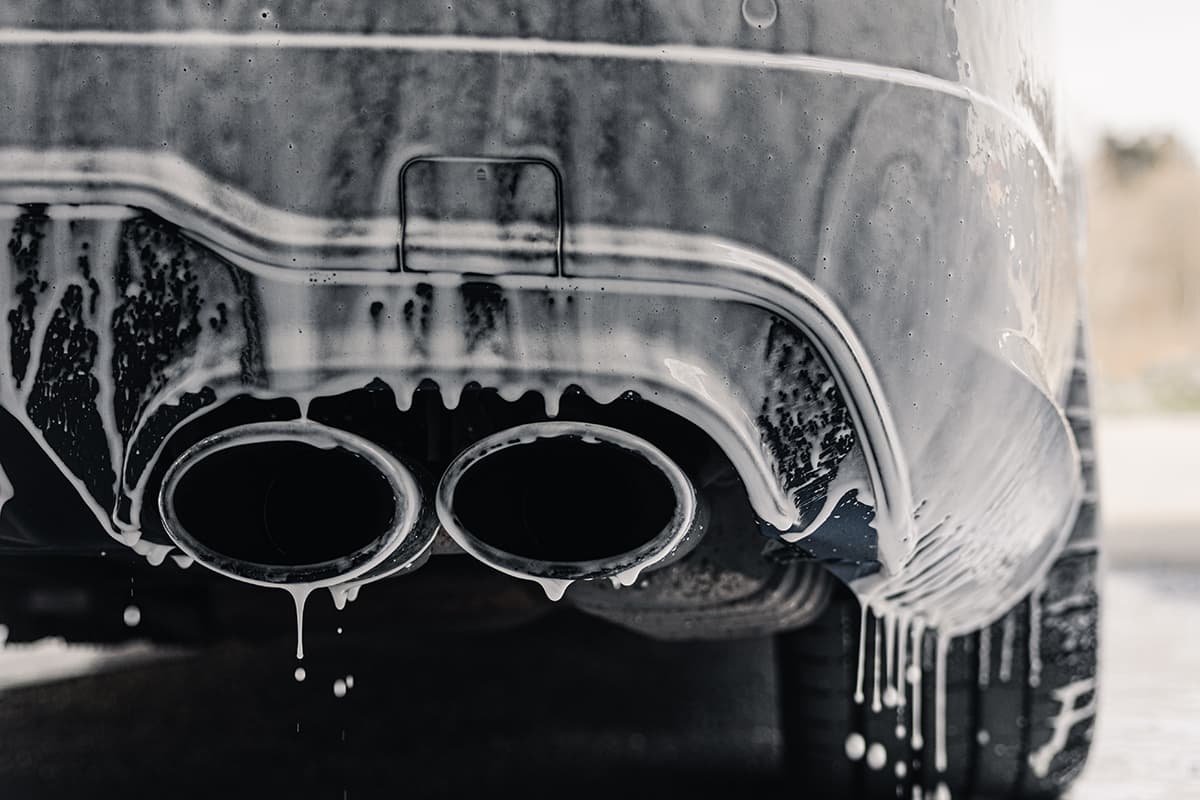
4. Exhaust
This quick and easy step is often missed at this point and many wash the exhaust tips when they do the paint work, this will lead to your wash bucket and or mitt getting carbon and other exhaust contaminates mixed into them potentially spreading them over your paint work.
After cleaning wheels simply spray some W1 Wheel Cleaner and Iron Remover on your exhaust tips, leave to sit for 2-3 minutes, agitate with a detail brush and then rinse thoroughly with a pressure washer.

5. Paintwork, Panels, and Windows
The Two Bucket Method
Utilising the two bucket method is key to minimising the chances of dirt and contaminants getting into your shampoo mix or your wash glove/sponge.
The first bucket contains your wash mix, we recommend either S1 Premium Shampoo or S3 pH Neutral Shampoo diluted with water as per label.
The second bucket contains just water.
Ideally, have a grit guard in both buckets.
Start from the top of the vehicle and work down. Wash one panel at a time.
Spray the panel with water to wet it down, load up your wash glove/sponge with shampoo mix by dunking it into bucket one, and then wash down the panel. Where possible, a cross hatch motion is great to ensure you don’t miss an area. Place your wash glove/sponge into bucket two. Rinse the panel off using a pressure washer. Rinse out your wash glove/sponge thoroughly in bucket two and then move to the next panel and repeat the process again until the entire car is clean!

6. Protection and Drying
Now that your vehicle is clean, it’s time to get it dry in the correct manner. Most water that comes out of your tap contains a lot more than just H2o. Tap water usually contains a mix of dissolved minerals and metals. If you were to simply leave your car to dry on its own, these minerals, metals, and other chemicals are what cause water spots on your paint.
There are many ways to dry your vehicle. Our preferred method is to use a small leaf blower to blow 90% of the water off the car; same as washing, start from the top and work down. Once done, get the rest of the water off with a high quality Microfibre Drying Towel. This method minimises the amount of contact with the paint.
If you do not have access to a blower simply dry the car down with a Microfibre Drying Towel.
Applying some form of paint protection now is a great idea, it will help repel dirt and grime and make it easier to clean your vehicle next time. There are a few options when it comes to paint protection; some are easier to apply but don’t last as long and others can last years but require a lot more work to apply. The two most common forms of paint protection our customers apply are P1 and P2.
P1 is the easiest; it produces an amazing hydrophobic effect. Once the car is washed and clean it is simply sprayed onto the paint while the car is still wet, then rinsed with water, and then dry the car as normal. Our tip here is to work on one panel at a time. Spray P1 directly onto the panel and then spread the product out with a damp wash glove to ensure an even coating.
P2 is a little more work to apply but lasts longer. The car needs to be clean and completely dry, most of our customers will do this a few hours later when their car is in the garage ( it’s very important this product is not applied in direct sunlight ).
Focus on one panel at a time, spray a small amount onto an applicator and spread over the panel using a cross hatch motion, leave the product to sit for 3-5 minutes and then buff off using a high quality microfibre cloth. Our tip here is to use less product than you think as P2 goes a long way. Most customers that have not used this product before tend to use too much and this makes it harder to buff off, P2 can be layered so it’s best to do two to three very light coats ( allow at least 30 mins between coats ) than try for one thicker coat.
